
Educational
How to Integrate Green Screen Motion Overlays in Premiere Pro & After Effects
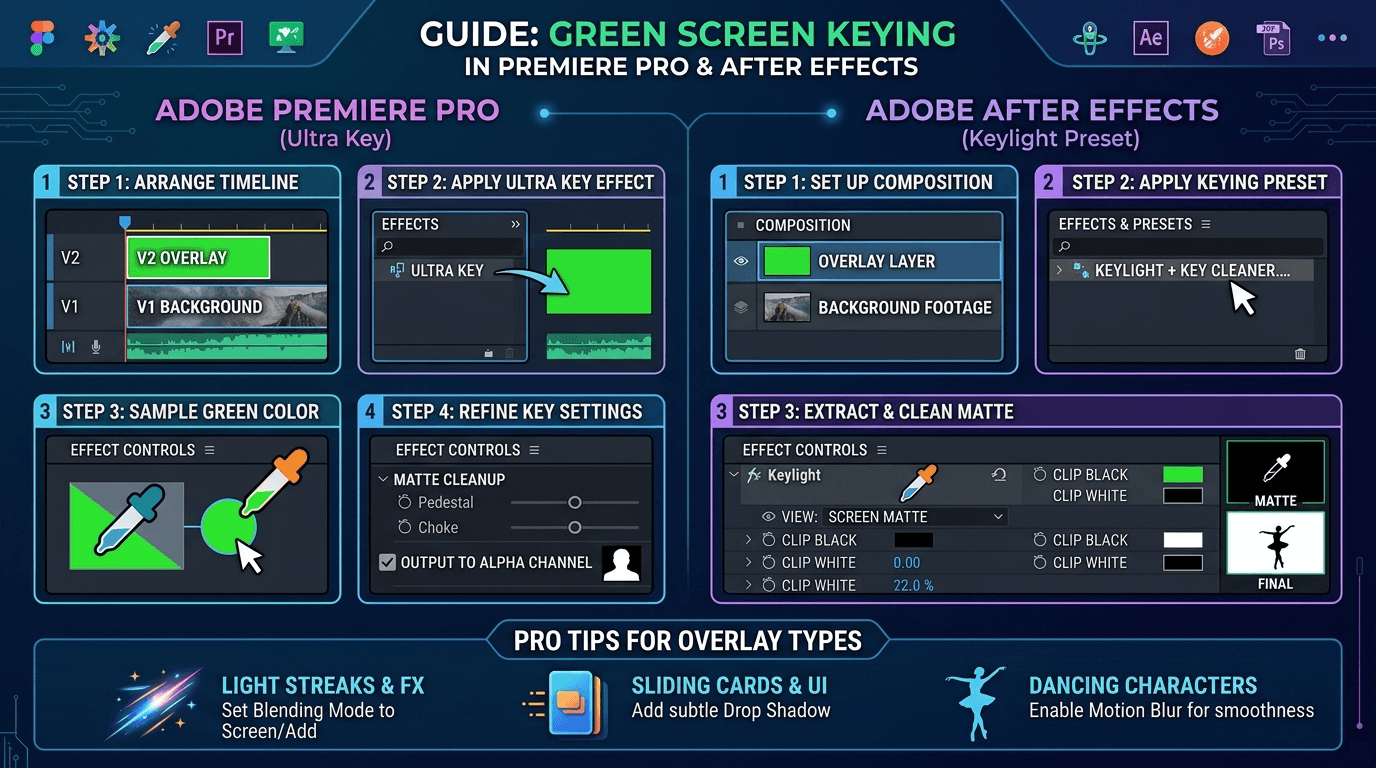
Integrating green screen motion overlays—like animated sliding cards, lower thirds, dancing characters, or dynamic light streaks—instantly elevates video production value. Keying out green backgrounds smoothly takes just a few quick steps in both Adobe Premiere Pro and After Effects.
1. Fast Keying in Adobe Premiere Pro
For quick edits, social media clips, and standard lower-third overlays, Premiere Pro’s built-in Ultra Key tool handles motion elements cleanly.
Step 1: Arrange Your Timeline Tracks
Drag your main background video onto Video Track 1 (V1).
Place your downloaded green screen motion overlay on Video Track 2 (V2) directly above it.
Step 2: Apply the Ultra Key Effect
Open the Effects panel (
Window > Effects).Search for Ultra Key and drag it directly onto your green screen clip on V2.
Step 3: Sample the Green Screen Color
Select the overlay clip and open the Effect Controls panel.
Click the Key Color eyedropper tool.
Click a solid green area on your preview monitor—preferably close to the main graphic element.
Step 4: Refine the Key Settings
If the default key leaves glowing edges or semi-transparent spots:
Setting Output to Alpha Channel: Under Ultra Key settings, change Setting from Default to Aggressive to quickly remove lingering green noise. Switch Output from Composite to Alpha Channel to inspect your matte (the graphic should be pure white, and the background pure black).
Matte Cleanup: Adjust Pedestal and Choke slightly if edge lines appear around thin elements like light streaks or card borders.
Spill Suppression: If green light spills onto transparent areas of your graphic, tweak the Spill Suppression settings to neutralize the tint.
2. Advanced Keying in Adobe After Effects
For high-end compositing, glowing light streaks, or motion overlays requiring camera tracking and motion blur, After Effects delivers pixel-perfect results using Keylight.
Step 1: Set Up the Composition
Drag your green screen overlay onto the New Composition icon.
Drop your main background footage into the timeline underneath the overlay layer.
Step 2: Apply the Keying Preset
Go to the Effects & Presets panel (
Window > Effects & Presets).Search for Keylight + Key Cleaner + Advanced Spill Suppressor (located under Animation Presets > Image - Utilities).
Drag this preset directly onto your green screen layer.
Step 3: Extract the Key & Clean Matte
In the Effect Controls panel, find Keylight.
Select the Screen Color eyedropper tool and click the green background. (Tip: Hold
Ctrl/Cmdwhile clicking to sample a larger pixel range for accuracy).Change View from Final Result to Screen Matte.
Expand Screen Matte settings. Lower Clip Black slightly to clean background noise, and boost Clip White to make sure solid graphics remain 100% opaque.
Switch View back to Final Result.
Pro Tips for Specific Overlay Types
Light Streaks & Glowing FX: Set the keyed layer's Blending Mode to Screen or Add. This completely drops dark shadows and blends bright light streaks naturally into the background.
Sliding Cards & Graphic UI: Apply a subtle Drop Shadow effect (
Distance: 5-10,Softness: 20) to separate 2D cards visually from the background footage.Dancing Characters / Cutouts: Enable Motion Blur on the key layer in After Effects to smooth fast movement and eliminate jittery key edges.
Green Screen Ref: https://marketplace.shapeunseen.com/asset/3d-blank-card-sliding-animation-green-screen